That’s a really good question. Unfortunately it’s usually the wrong question to ask.
The right questions are:
-
What accuracy do I need?
-
How much effort is required to achieve that accuracy compared to alternative methods?
Why? Because photogrammetry can achieve almost any accuracy you desire, provided you make the pixel size small enough. Of course, if you make the pixel size smaller, you need more images to cover the same area, which means more effort is required — which is why the second question is important.
But how accurate can it be?
OK, there are circumstances where the limits to accuracy might be important, so in Part 1 I’ll look at what the limits actually are.
Fundamentally, there are limits to how small the size of a pixel on the surface on an object can be — you can’t see something smaller than the wavelength of light, and that’s about half a micron (depending on colour). This is why we have electron scanning microscopes instead of just making optical microscopes with stronger and stronger lenses. The smallest object pixel sizes I’ve used, with conventional lenses and normal cameras, have been 5–10 times larger than that.
The most accurate published result with our software is 5 µm in plan and 15 µm in depth, using a pair of 6 megapixel Canon EOS 300D digital SLRs with macro lenses. (More on “plan” and “depth” later.) That used an object pixel size of around 10 µm. The purpose was for measuring denture wear, so in that case the small area covered by an image with that object pixel size wasn’t a problem and the accuracy required was high.
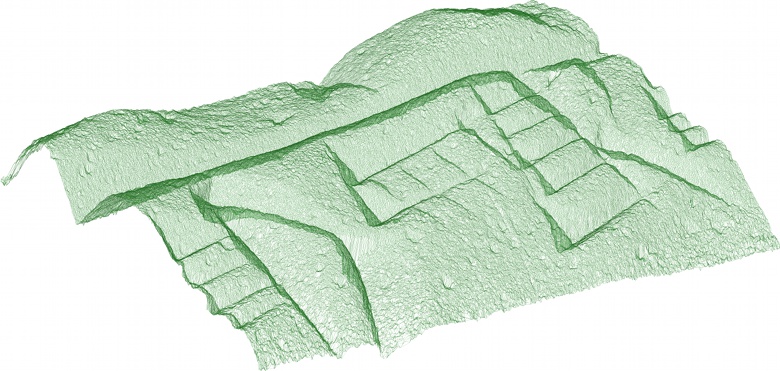
Another area where high accuracy and levels of detail can be important is in creating digital models of archaeological artefacts in heritage mapping like those shown below, where a 15 cm/6 inch high cuneiform cone was modelled. The first image shows a 26 mm × 14 mm portion of the cone’s surface model as a wireframe. The point density is just over 1,000 points per square mm:

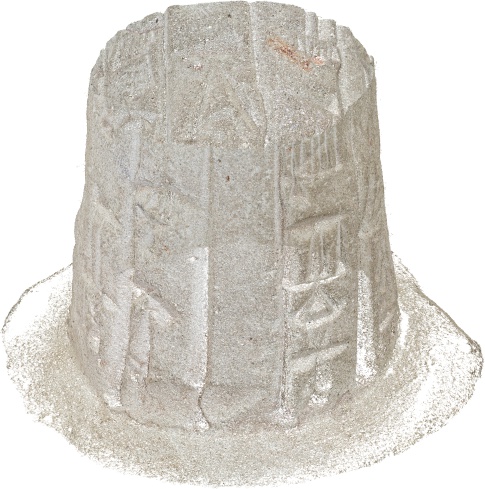
The next image shows the base of the cone as a colourised point cloud:

To “prove” that the point cloud was really a point cloud and not a textured mesh I had to render the point cloud at a high resolution and then resample it down to a lower resolution, so that the points would become smaller than a pixel in size and therefore a little “transparent”. Even rendered with a 50 µm pixel size, using one pixel to render a 3D point meant the surface was completely opaque because the average point spacing was 30 µm!
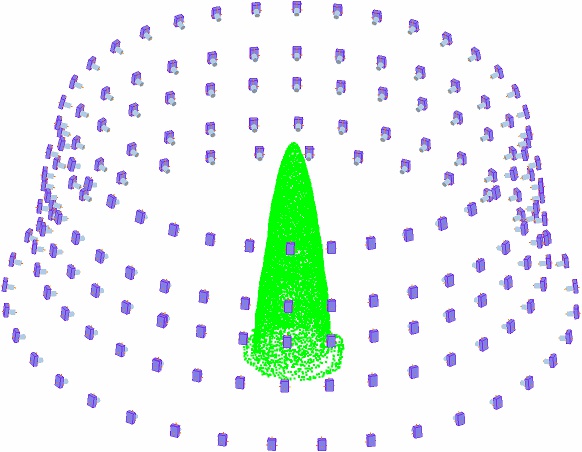
Finally, here we have the camera positions used to capture the cone. The cone was placed on a turntable and rotated while the camera was held stationary for each rotation of the cone. It looks like the camera is going around the cone because the data is shown in the cone’s reference frame. The green dots are points on the cone detected automatically by the software so it can determine the position and orientation of the camera at the time each image was captured:

So, if you really do need detail and accuracy, and the area to be captured is not too large, then ~1,000 points per square mm accurate to ~15 microns can be achieved using inexpensive off-the-shelf digital cameras and lenses.
Otherwise, you need to estimate how much accuracy you will be able to achieve using a particular setup so you can minimise the effort required (by capturing as much area in each image as you can) while still being able to deliver the accuracy specified. In Part 2 I’ll look at how you can predict the accuracy of the data in a photogrammetric project and then give some real-life examples to illustrate the effort required.
Pingback: How Accurate is Photogrammetry? — Part 2 « ADAM Technology Team Blog
Pingback: How Accurate is Photogrammetry? — Part 3 « ADAM Technology Team Blog
#1 by George Bevan on 11th June, 2011 - 3:26 am
Jason,
Could you say a little bit more about the selection of lenses for extremely high-detail close range photogrammetry of this sort?
#2 by Jason on 20th June, 2011 - 10:44 am
Hi George,
You need macro lenses to achieve that level of detail. The pixels on the object are (d ÷ f) times larger than the pixels on the image sensor, where “d” is the distance to the object and “f” is the focal length of the lens, both in the same units.
For the Canon EF 100mm f/2 USM lens, for example, the minimum focus distance is 900 mm, so the smallest object pixel size obtainable with that lens on a Canon EOS 5D Mark II camera is (900 ÷ 100) × 6.41 µm = 58 µm.
If you use a 1× macro lens, however, like the Canon EF 100mm f/2.8L macro lens, you can focus at a distance the same distance as the focal length, so d = f, allowing object pixels as small as 6.41 µm with a Canon EOS 5D Mark II. A 0.5 × macro lens like the EF 50mm f/2.5, on the other hand, would allow a minimum object pixel size of 12.8 µm.
(Note that the actual distance it is focussed at is not necessarily the same as “d” above because internally the lens is a lot more complicated than the single element modelled by photogrammetry — the EF 100mm f/2.8L achieves 1:1 at a physical distance of 149 mm, for example.)
The only real obstacle to deal with when taking extremely close-range images like this is that the depth of field becomes very shallow. This wouldn’t be a problem for your coins but it can make objects with a lot of surface relief more challenging.
#3 by George Bevan on 14th August, 2011 - 12:12 am
Thanks Jason! Our group uses the Nikon D300s and D700, and macro lenses of 105mm and 80-170mm (Nikkor zooming macro). We may also try out the 200mm Nikon which is an optically superb lens.
We’ve achieved the calibration of these lenses using two geared columns and a ball-head to move the camera precisely in an x-y grid. How was calibration achieved with your macro lenses? We found calibration to be the most challenging part.
Our interest is coins, but even more importantly inscribed writing materials, particularly inscriptions and petroglyphs.
#4 by Jason on 6th September, 2011 - 6:55 pm
Hi George,
With 3DM CalibCam you don’t need to move the camera precisely (or in any particular way at all) for the calibration, so that shouldn’t be a problem. Three or more images (preferably at least six) from different vantage points of an object/scene with points in all three dimensions (and going to the edges of the images) is enough. (In the cuneiform cone example above, I actually used the images of the cone itself to calibrate the camera — all 186 of them!)
The problem when doing small scale work is more one of optics — having sufficient depth of field that the focal length can be calibrated accurately. Normally when doing a calibration I try to have a range of distances of points in the scene that’s about 1/3 the distance from the points to the camera, but with the shallow depth of field you get with extreme closeups that becomes difficult.
You’ll see this show up in the calibration report as a high sigma on the focal length.
The only way to increase the accuracy is to increase the range of distances of points (or increase the accuracy of observations — centroiding circular targets can help).
Note that an error in the focal length translates into an error in scale. If you are deriving scale from the scene itself (a ruler, say, or control points) rather than from known camera locations, then this will translate into an error in the derived camera locations (which aren’t important) rather than in the data itself. The exterior orientation can quite easily overcome a small error in focal length by fudging the camera locations in this way. It’s only a concern when you use known camera locations to derive scale instead of points within the scene itself.