In order to display a scene in stereo (or “3D”, as it’s called in the movies) we need to send a different image to each eye, to simulate the effect you would have if you were looking at that scene in real life.
With stereo photogrammetry, of course, we already have two images of the scene taken from different locations. By using those images, we don’t even need to know in advance what the layout of the scene is — all we need is a way to ensure that the left image is shown to the left eye and the right image is shown to the right eye, which is precisely what the Stereo View does. (The 3D View that most users would be more familiar with allows us to look at the scene from other locations, but to determine what the scene looks like from those other locations requires a 3D model of the scene, such as a DTM. The Stereo View does not need a DTM to work because the original images already capture what the scene looks like from the viewpoint of those images!)
The most primitive technique for presenting a different image to each eye is the anaglyph mode — simply make one image red, say, and the other blue, and then wear a red filter over one eye and a blue filter over the other. The red image passes through the red filter and is seen by only that eye, while the blue image passes through the blue filter and is only seen by the other eye.
While this is cheap and will work with any display hardware, the effect is not terribly impressive, and you need to be careful what colour things are — the default red colour used for rendering DTM triangles will be visible as red in the red-filtered-eye but black in the blue-filtered-eye. To work well, everything really needs to be in black and white (or, more correctly, shades of grey).
The Good Old Days
When we first added the Stereo View to 3DM Analyst over ten years ago, the state-of-the-art was LCD shutter glasses that used infra-red emitters to make each lens alternate between transparent and black. When the monitor was showing the left image, the emitter would tell the glasses to make the left lens transparent and the right lens opaque, and the left eye would see the image. Then, a fraction of a second later, the monitor would display the right image, and the emitter would tell the glasses to make the left lens opaque and the right lens transparent. Provided the frame rate was high enough, the brain would merge these two flickering images into a single stereo view.
At that time we used CRT monitors, which had no problems reaching frame rates of 120 Hz, allowing each eye to see 60 frames per second — fast enough to avoid flicker. Furthermore, CRT displays had no problem showing alternating images one after the other with no “ghosting” caused by an after-image of the previous image being visible.
Shutter glasses at that time were quite expensive (~A$1,200 each) and fairly heavy, which made wearing them for long periods of time unpleasant. They also cause the entire field-of-view to flicker, so if you were using fluorescent lighting that was flickering at 50 Hz with shutter glasses that were triggering at 60 Hz per eye, the effect was rather unpleasant. The fact that peripheral vision is predominantly made up of rods, which are very sensitive to flicker, made things even worse.
The next technology we bought was a polarising filter placed over the front of the monitor. This filter would polarise the light as it passed through it and the polarisation could be switched each frame.
From the CRT monitor’s point of view, nothing was different — it just showed 120 frames per second, alternating between the left eye and the right eye. But rather than bulky LCD shutter glasses, lightweight polarised glasses could be worn that were exactly like sunglasses except each lens had a different polarisation. They even came in a tasteful tortoiseshell design. (The exact same glasses are used in the cinema for modern 3D movies, in fact, although tortoiseshell seems to have gone out of fashion. In the cinema, two projectors are used with a static polarising filter over each, and the frames are projected onto a polarisation-preserving screen that ensures the reflected light has the same polarity as the original light. This allows both images to be present on the screen at the same time — try taking the glasses off during the movie to see this — while the polarising glasses only allow one of those images to be passed through to each eye.)
In the computer monitor’s case, the polarising filter polarises the light one way for the left image, and the left lens allows that light to pass through its own filter while the right lens completely blocks it because the polarity is wrong. Then the right image is shown, the polarising filter switches polarisation, and the left lens then blocks the light while the right lens allows it through.
This is far more comfortable for long-term use because the glasses are very lightweight, and there is no flickering in the peripheral vision because the glasses themselves remain transparent at all times.
The biggest problems are that even though the glasses themselves were much cheaper (~$120), the polarising filter for the monitor cost us about A$4,000 at the time, and the polarising filter doesn’t work with LCD monitors because the light is already polarised (making the screen go black if you place the filter in front of it) and refresh rates were too low.
The Dark Ages
Unfortunately, both of those technologies became ineffective thanks to the demise of the CRT monitor. CRTs are big, and bulky, and don’t have terribly high resolution, but the one thing they did have was the ability to change images cleanly and quickly at very high frame rates.
LCDs are light, flat, and sexy, but, until recently, slow. Most LCDs only allow 60 Hz refresh rates at most (which would make for an intolerable 30 Hz per eye), and even that is misleading if you look at what happens as soon as you drag a window full of text around the screen — most LCD’s can’t really change image completely from one frame to the next and ghosting is a serious problem.
There have been various attempts at using LCDs to construct stereo display devices that we’ve seen, but most have not been terribly attractive — until now.
A New Hope
The very latest generation of LCD monitors have actually achieved something of a breakthrough, driven in part by the market for 3D games (and possibly 3D movies).
We recently purchased an Asus VG236H 23″ 3D Monitor with NVIDIA 3D Vision Kit for A$463, excluding GST. It not only includes a nice, full HD monitor (1920 x 1080 pixels) that really is fast enough to run at 120 Hz with no more ghosting than the old CRTs, but it comes with one pair of glasses and an infra-red emitter.
The glasses themselves are the old, LCD-shutter-style type that we used to use ten years ago, but they’ve come a long way — no longer bulky and painful to wear for long periods of time, they’re now not much heavier than the polarising glasses. The only downside is that because they are shutter glasses, the synchronising with fluorescent lighting remains an issue, especially in countries (like Australia) with a 50 Hz AC frequency. (I prefer to turn the lights off and run the monitor at 120 Hz rather than leave them on and run the monitor at 100 Hz. The extra 20 Hz makes a lot of difference to the “solidity” of the image to my eyes.)
NVIDIA has a 3D Vision Pro kit as well, in addition to the “consumer grade” 3D Vision kit that ships with this particular monitor. The only difference, however, is that the Pro kit uses Wifi for triggering the glasses rather than infra-red. This allows for greater range, allows the glasses to work even if the direct line-of-sight from the transmitter to the glasses is interrupted, and allows you to have many emitters in the same room but have the glasses only respond to the particular emitter that they are paired with. The Pro kit also costs a lot more. For most users, the consumer-grade kit is perfectly fine.
Graphics Card
The other key to the puzzle is, of course, the graphics card.
While the 3D gaming craze has given us access to stereo monitors at an unprecedented price point, it hasn’t done the same for graphics cards for professional, non-gaming software like 3DM Analyst because NVIDIA considers stereo display in a window to be a “workstation”-class feature.
Games, you see, render a 3D scene, and the graphics card driver can easily convert that into stereo automatically simply by rendering it twice from two different viewpoints. A key characteristic of games is that they tend to be played in full screen mode.
Professional software, like 3DM Analyst, needs direct access to the two view buffers, because in the Stereo View we aren’t rendering a 3D scene at all, we’re simply showing images that were originally captured from two different locations (with digitised vector data overlaid). We also want to be able to show it in a window, with toolbars and other applications running at the same time.
NVIDIA takes advantage of these differences to sell really powerful cards at a low price to compete in the gaming market, and much more expensive cards with minor additional features to customers who want to do serious work.
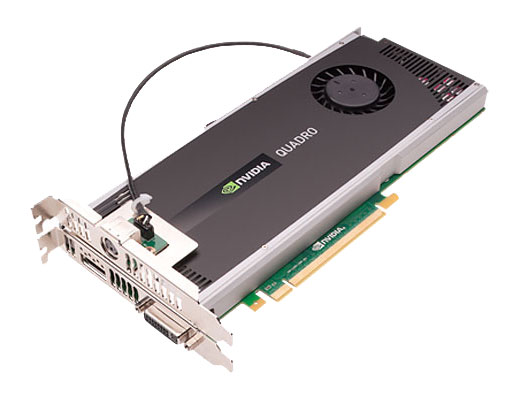
In spite of this, the new NVIDIA Quadro 4000 (not to be confused with the very old Quadro FX 4000) is a very compelling offering. Based on the new Fermi architecture, it is reasonably powerful compared to the high-end consumer-grade GeForces, but has all the workstation functionality (including stereo support) at a much lower price point than similarly powerful cards in the past (we paid A$1160 ex. GST).
Hardware Configuration
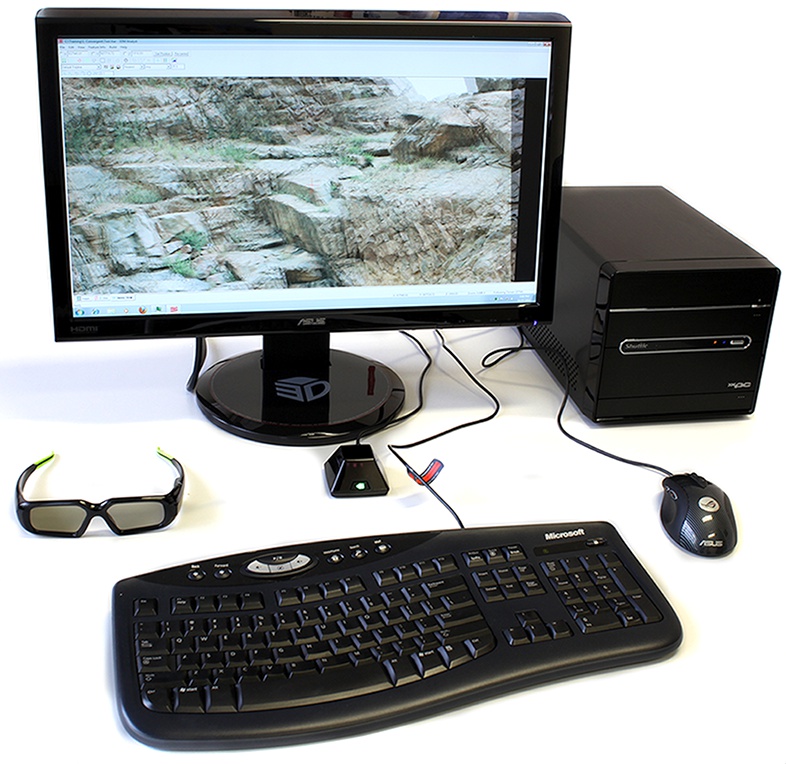
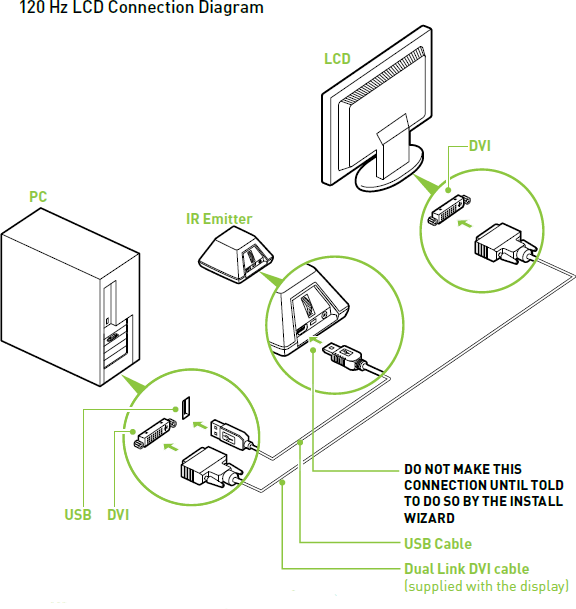
This is the setup we used for the workstation shown at the top of this post (from page 11 of the NVIDIA 3D Vision Installation Guide):

Note that the trigger for the emitter is sent via the USB port. This can potentially cause timing issues, so high-end graphics cards also provide a 3-pin mini-din VESA stereo connector that can be connected directly from the graphics card to the emitter to provide a more reliable trigger signal. However, on the Quadro 4000 this is an optional extra — for the LeadTek Quadro 4000 we bought it’s part number 126F8000200, “3D Stereo Bracket”, and cost an extra $35 ex. GST.

Unfortunately, as noted on NVIDIA’s website, for Quadro boards with a stereo connector, we have to “use the 3-pin mini-din to 1/8” stereo cable that comes with the 3D Vision kit to connect the graphics board to the emitter”.
However, as it it also notes, “3D Vision glasses kits sold in Europe and Asia do not currently contain this cable”.
Why? No idea. What I do know is that Australia is considered part of “Europe and Asia” and we miss out on the cable as well, so we’re using the USB trigger for now (which, fortunately, has proven to be quite reliable anyway).
Operating System
We use Windows 7 Ultimate 64-bit on all our newer PCs. Until relatively recently this would have been a problem, because Microsoft decided that nobody needed quad-buffered OpenGL support any more (the feature that 3DM Analyst uses) when they released Windows Vista, despite it being in every version of Windows since at least NT 4.0, and so people wanting to use stereo had to stick with Windows XP. Fortunately NVIDIA and (I believe) ATI found a work-around that allows stereo to work again in Vista and Windows 7, although it appears to be not-quite-100%-perfect — as soon as stereo is activated the “Aero Glass” feature on the desktop (the translucent border and shadows around windows) is switched off until the stereo application quits. This doesn’t affect just 3DM Analyst, it affects every stereo-enabled application that we tried. It’s a shame that Microsoft decided to remove support for stereo in the operating system, but at least the graphics card vendors found a way around it.
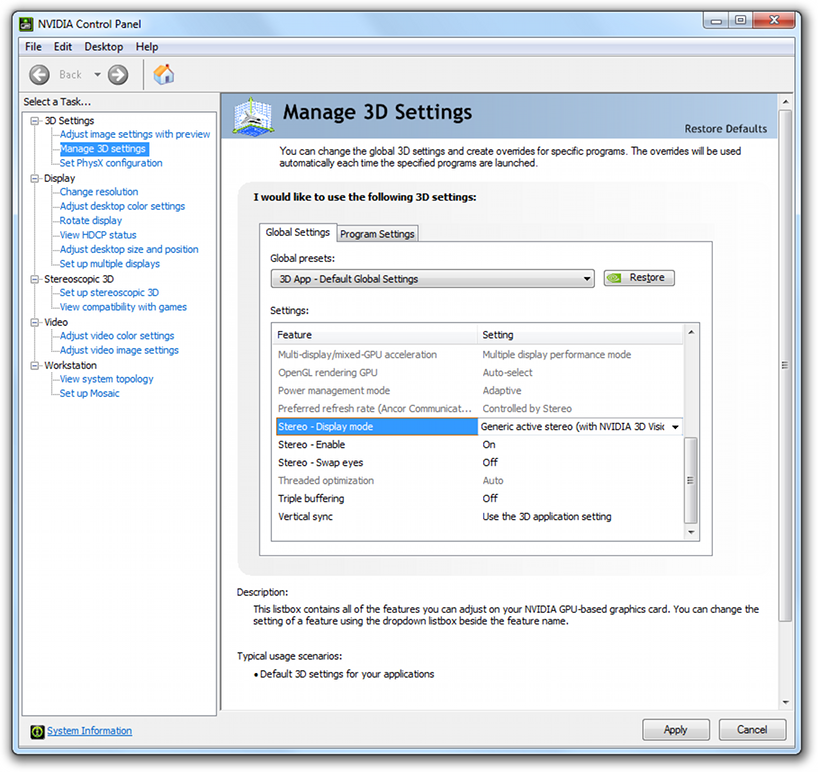
To actually enable stereo you need to right-click on the desktop and select “NVIDIA Control Panel”. Then under 3D Settings click “Manage 3D settings”, and then under Settings select “Stereo — Enable: On” and “Stereo — Display mode: Generic active stereo (with NVIDIA 3D Vision)”. (Presumably if you had the stereo cable you would instead use “Stereo — Display mode: On-board DIN connector (with NVIDIA 3D Vision)”.)

3DM Analyst
Once stereo has been enabled in the graphics driver, start 3DM Analyst and proceed to Settings | Globals | Stereo View Settings. If “Polarization” is not ghosted out then 3DM Analyst has correctly detected that the graphics driver supports quad-buffered OpenGL and if it’s not enabled, click on it. (“Polarization” is obviously not a good name — actually that option refers to any solution that uses quad-buffered OpenGL, whether it’s polarising filter or LCD shutter glasses or any of several other technologies. That’s what happens when you keep using the same solution for a long time…)

If “Polarization” is ghosted out even after enabling stereo in the NVIDIA Control Panel then try rebooting the PC first.
If you had to enable it then at this point you’ll need to restart 3DM Analyst, and from then on, whenever you visit the Stereo View, you should find it to be in full colour stereo/3D.
The controls for the Stereo View are similar to the 3D View but not identical. The yellow cross in the middle of the screen is called a “floating mark”, and you can change its size and shape by clicking on the “Crosshair” button in the toolbar. You can change its colour by selecting “Floating Mark” in the “Colour Settings” tab of the Settings dialog. You can also change its apparent 3D depth by using the left and right arrow keys on the keyboard — by default it is located on the screen, but some people prefer to see it in front of the monitor, and others prefer to see it behind the monitor. Avoid changing the depth too much because even though you can set it at any distance away from you that you like, your eyes will still be focussed at the actual distance of your monitor, and it can get tiring for your eyes if you have them looking at a distance greatly different from the distance they are focussed at. (Normally the two always change together and it takes a bit of effort for your visual system to disassociate perceived distance from focal distance.)
The floating mark corresponds to the 3D co-ordinate shown in the bottom-right of the dialog. To place it on points in the scene you move the scene itself while the floating mark remains fixed. To pan the scene, press the left mouse button and move the mouse; to move the scene towards you or away from you, press the right mouse button and move the mouse up and down. To zoom in and out, press the right mouse button and the Shift key and move the mouse left and right. Press the Tab key to enable terrain following mode, which uses the DTM to place the floating mark on the ground for you automatically, which can greatly speed up digitising.
Digitising is the same as in the 3D View. One thing you’ll note about the Stereo View is that it seems to give a much higher resolution view of the scene than the 3D View does — partly this is because you are using two independent images of the scene (which theoretically should increase the level of detail by about 40%), and partly it’s because less filtering is being done on the images, preserving more of the original detail. Because you have complete control over the location of the floating mark in the scene, it’s also possible to easily digitise features that would be difficult using the 3D View because they are too small or too thin to be resolved well by the DTM.
It is also possible to delete points in the DTM by hand, add more points to the DTM, and visually check the DTM’s accuracy.
Hopefully now that stereo visualisation technology has become more accessible than ever before, the Stereo View will become a much more prominent feature of the software and not only used by hard-core photogrammetrists.
Hardware Specifications
For those interested, the hardware specs for the stereo workstation pictured at the top of this post are:
| Case | Shuttle SX58H7 PRO Barebone XPC |
|---|---|
| CPU | Intel Core i7 950 Nehalem CPU |
| RAM | Kingston 12GB Triple DDR3 1333 Memory |
| HDD | 1TB Western Digital Caviar Black |
| Optical Drive | LG BH10LS30 Blu Ray Writer |
| Graphics | Leadtek Quadro 4000 with 3D Stereo Bracket |
| OS | Windows 7 Ultimate 64 bit |
The total cost was A$2,530 ex. GST for the PC and A$463 ex. GST for the monitor, so less than A$3,000 in total. The purpose of the Shuttle case was to make it semi-portable so we could take it to exhibitions — I’m not aware of any laptops that powerful and the closest ones cost around twice that much.
#1 by Jason Wilden on 4th February, 2012 - 9:52 pm
Hi – wow – ancient history!!
I’ve not thought about Adam Technology for many a year but tonight had a sudden inkling to see whatever happened to what we sweated many hours on and created!
I was the development lead on the original HSIC project in 1997! What now is called 3DM analyst (and I have to say that some of those images where the ones we were working on 12 year ago). Cool to see that the stuff we did is made it into being a viable commercial system! At the time the computers were slow enough that correlating the points of interest in the images were slow enough that we could watch the world go by while it happened.
Hope you guys are going well! I’m sure things have changes totally since my days at Adam Technology.
Cheers.
Jason.
#2 by Jason on 15th March, 2012 - 11:20 am
Hi Jason,
Yes, I remember you! Seems like there were almost as many Jason’s here as there were Peter’s!
For other readers, HSIC stood for “High Speed Image Correlation”, and from memory I think it managed a hundred points per second or so on 1997 PCs. Of course, that’s still a few hundred times faster than digitising DTM points manually would be!
Now we get about 35,000 points per second. 🙂
We renamed the technology “3DM” around 1998 and then spent a few years using it to build factory control systems, like the 3DM Bunker and 3DM Gob system, because the software was fast enough to process video-resolution images in real-time.
We started 3DM Analyst in 2001, by which time consumer digital cameras were good enough to be useful for general terrestrial photogrammetric applications. 3DM CalibCam followed in 2004.
It’s been a long and interesting journey!
Cheers,
Jason.
#3 by Silvis on 18th August, 2012 - 12:00 am
I wonder if this type of set up would work on a mac pro? I have the the same graphics card. Do I need 3D display to make this work?
#4 by Jason on 30th August, 2012 - 1:51 pm
Yes, the graphics card is only half the equation — you need a 3D display to go with it.
Fundamentally, you need a way to get a different image into each eye. The nicest systems use passive polarising glasses (like the cinema) and very high framerates (120+ Hz) to alternate between the two images. Projectors (like those in the cinema) have another technique that depends on a screen preserving the polarity of the incident light, and that’s to use two different projectors to project two full-resolution images simultaneously at the same screen. Because the polarity of the photons from each projector isn’t affected by the photons from the other projector, your eyes (with polarising filters in front of them) still each only see the image from the corresponding projector.
I read some time ago about an LCD monitor that used two layers of panels to produce a similar effect, but I don’t know what happened to it.
Unfortunately, most display technologies can’t display two images at the same time at full resolution, so you have to either display each image at full resolution and then swap images at high frequency, or display both images simultaneously but at half resolution (either alternating vertical columns of pixels or alternating horizontal rows of pixels). The former type are far better provided the frame rate is high — with the latter, text and normal visual elements become hard to read because they are often only one pixel high/wide and therefore are only visible in one eye.
I imagine the LCD monitor mentioned above would work with the Mac but I haven’t actually researched it to find out.